Best Ever Sourdough Bread Recipe is all about that perfect crunchy crust and soft, tangy inside that just makes homemade bread feel so special. With simple ingredients like flour, water, salt, and a lively sourdough starter, this recipe guides you through each step to get that satisfying rise and lovely air pockets in every slice.
I love baking this bread because it’s like little magic happening right in your own kitchen. Watching the dough bubble with life, smelling that gentle sour aroma as it bakes—it’s one of those hands-on baking moments that makes me proud and hungry all at once. My tip? Be patient with your starter and dough—it’s worth the wait.
When it’s done, I usually slice up a warm piece, slather it with butter, and enjoy it with a cup of tea or soup. It’s such a treat for breakfast or a cozy snack, and everyone I’ve shared it with keeps asking for the recipe. Making sourdough bread feels like a small achievement every time, and it’s a fun way to connect with an age-old tradition right at home.
Key Ingredients & Substitutions
Flour: Bread flour is best for a chewy texture and good gluten development. You can use all-purpose flour too, but the bread might be a little softer. A mix with whole wheat flour (up to 30%) adds a nice nutty flavor.
Water: Room temperature water helps activate your starter and hydrate the flour well. If your dough feels too sticky, try slightly less water next time. Filtered water works best if your tap water is very chlorinated.
Sourdough Starter: Use an active, bubbly starter for best rise. If your starter is new or less active, plan more fermentation time. For a milder flavor, feed your starter a few hours before mixing.
Salt: Salt controls fermentation and adds flavor. Don’t skip it! You can use sea salt or kosher salt; just measure by weight, not volume, for accuracy.
How Do I Get the Perfect Crust and Open Crumb in Sourdough Bread?
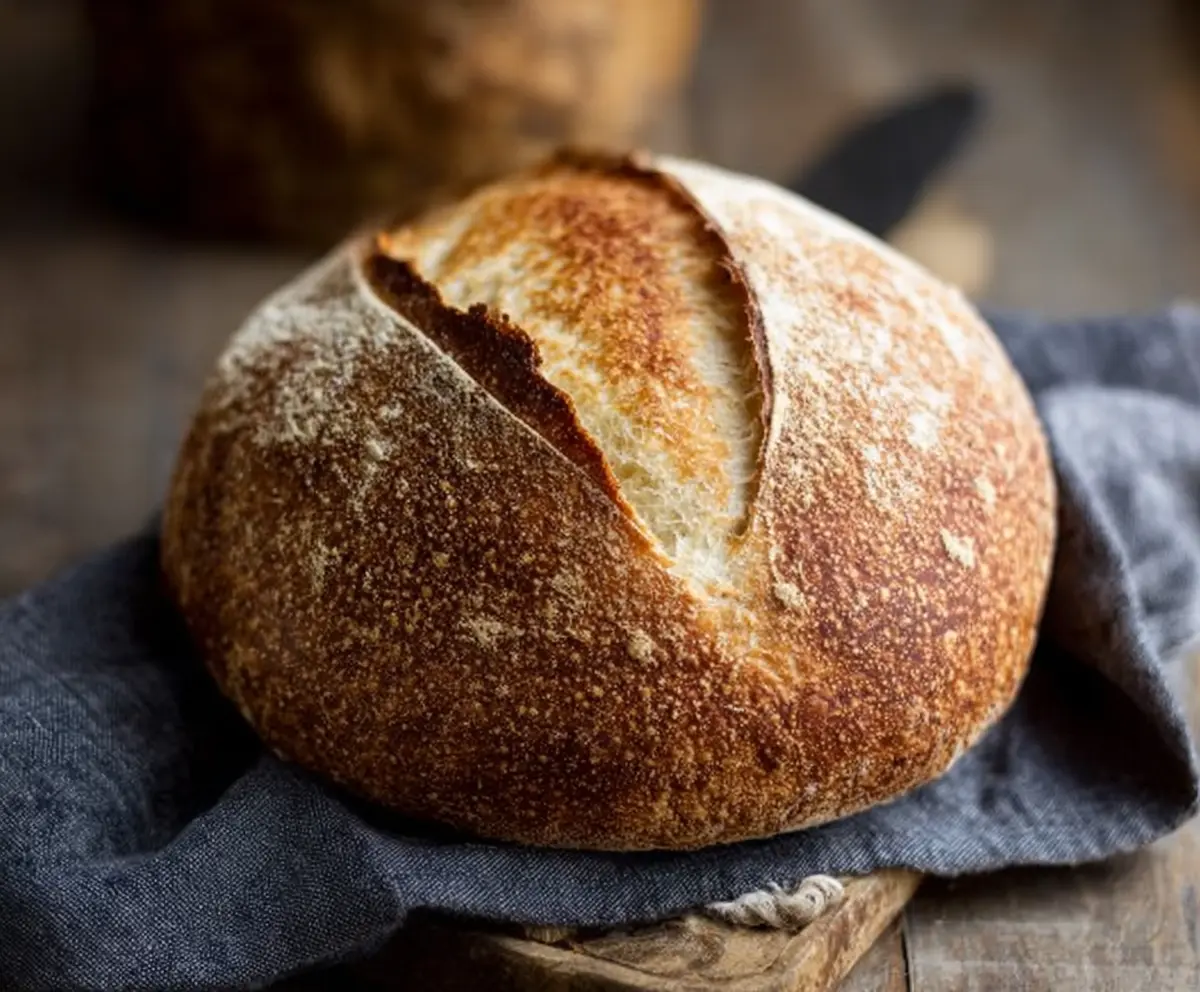
The key to a crunchy crust and nice holes lies in fermentation, shaping, and steaming your bread while baking.
- Fermentation: Let the dough rise until it passes the poke test—a gentle poke should slowly bounce back but still leave a slight mark.
- Stretch & Fold: Doing stretch and folds during bulk fermentation strengthens gluten and traps air, which helps form lovely crumb holes.
- Shaping: Create surface tension by gently pulling the dough edges under when shaping. This supports a good oven spring.
- Scoring: A sharp knife or bread lame lets steam escape, guiding your bread’s rise and forming eye-catching cracks.
- Using a Dutch Oven: Baking inside a preheated, covered pot traps steam, which helps create a shiny, crackly crust. Removing the lid midway lets the crust crisp up fully.

Equipment You’ll Need
- Large mixing bowl – roomy enough for mixing and rising, and easy to clean.
- Dutch oven or heavy lidded pot – traps steam for a perfect crust and even baking.
- Bread lame or sharp knife – helps score the dough so it expands nicely in the oven.
- Proofing basket or bowl with a floured towel – supports the dough’s shape during final rise.
- Dough scraper – great for handling sticky dough and cleaning your workspace.
- Kitchen scale – for accurate ingredient measurements, crucial in baking.
Flavor Variations & Add-Ins
- Add chopped rosemary and garlic for a fragrant, savory twist that pairs well with butter.
- Mix in toasted nuts or seeds (like sunflower or sesame) for crunch and extra nutrition.
- Try swapping 20-30% of the flour for whole wheat for a nuttier, heartier flavor.
- Stir in dried fruit like cranberries or raisins for a touch of sweetness, perfect for breakfast toast.
Best Ever Sourdough Bread Recipe (Step-by-Step)
Ingredients You’ll Need:
- 500g (4 cups) bread flour or all-purpose flour
- 375g (1 1/2 cups plus 1 tbsp) water, room temperature
- 100g (about 1/2 cup) active sourdough starter (fed and bubbly)
- 10g (1 3/4 tsp) salt
How Much Time Will You Need?
This recipe takes about 4 to 5 hours of active time, including mixing, folding, shaping, and proofing. Plus, you need about 1 hour for baking and cooling. The process requires some patience as the dough rises, but the delicious results are well worth it.
Step-by-Step Instructions:
1. Mix the Dough:
In a large mixing bowl, add the flour and water. Stir together until there are no dry spots. The dough will look rough and shaggy. Cover the bowl with a damp towel or plastic wrap and let it rest for 30 to 45 minutes. This helps hydrate the flour and kickstarts gluten development.
2. Add Starter and Salt:
After the rest, add your active sourdough starter and salt to the dough. Mix by hand thoroughly until everything is combined. The dough will be sticky—don’t worry! Cover the bowl again.
3. Bulk Fermentation and Stretch & Folds:
Over the next 3 to 4 hours, perform stretch and folds to strengthen the dough. Every 30 minutes, wet your hand, gently pull one side of the dough up, and fold it over the center. Turn the bowl and repeat this 3 more times. Do this 4 times total during the first 2 hours. Then let the dough rest until it nearly doubles in size.
4. Shape the Dough:
Turn the dough onto a floured surface. Gently fold the edges underneath to make a tight round loaf (called a boule). This tight surface will help your bread rise properly in the oven.
5. Proofing:
Place the shaped dough seam side up in a well-floured proofing basket or a bowl lined with a floured towel. Cover it and let it rise at room temperature for 2 to 3 hours until it passes the poke test—a gentle poke leaves an indentation that slowly springs back.
6. Preheat Oven and Dutch Oven:
About 30 minutes before baking, preheat your oven to 450°F (230°C) and place a Dutch oven or heavy lidded pot inside to heat up.
7. Bake the Bread:
Carefully remove the hot Dutch oven. Turn your dough out onto a parchment paper square and score the top with a sharp knife or bread lame. Using the parchment to lift it, place the dough into the Dutch oven. Cover and bake for 20 minutes.
8. Finish Baking:
Remove the lid and bake uncovered for another 20 to 25 minutes or until your bread turns a deep golden brown color with a crisp crust.
9. Cool:
Remove the bread from the oven and transfer it to a wire rack. Allow it to cool completely for at least 1 hour before slicing so the crumb finishes setting up.
Enjoy your homemade sourdough with its crunchy crust and tender, flavorful crumb. Perfect with butter, jam, or your favorite toppings!
Can I Use a Different Type of Flour?
Yes! You can substitute all-purpose flour for bread flour, but the texture may be less chewy. Adding up to 30% whole wheat flour can add flavor and nutrition, just adjust water if needed.
How Do I Know When My Sourdough Starter Is Ready to Use?
Your starter should be bubbly, active, and roughly doubled in size a few hours after feeding. It should float in water if you do the float test, indicating good fermentation.
Can I Make the Dough Ahead of Time?
Absolutely! After shaping, you can refrigerate the dough in the proofing basket overnight. Just let it come to room temperature and finish proofing for about 1-2 hours before baking.
How Should I Store Leftover Sourdough Bread?
Keep leftover bread in a paper bag or wrapped in a clean towel at room temperature for up to 3 days. For longer storage, slice and freeze it. Toast slices straight from the freezer for best freshness.