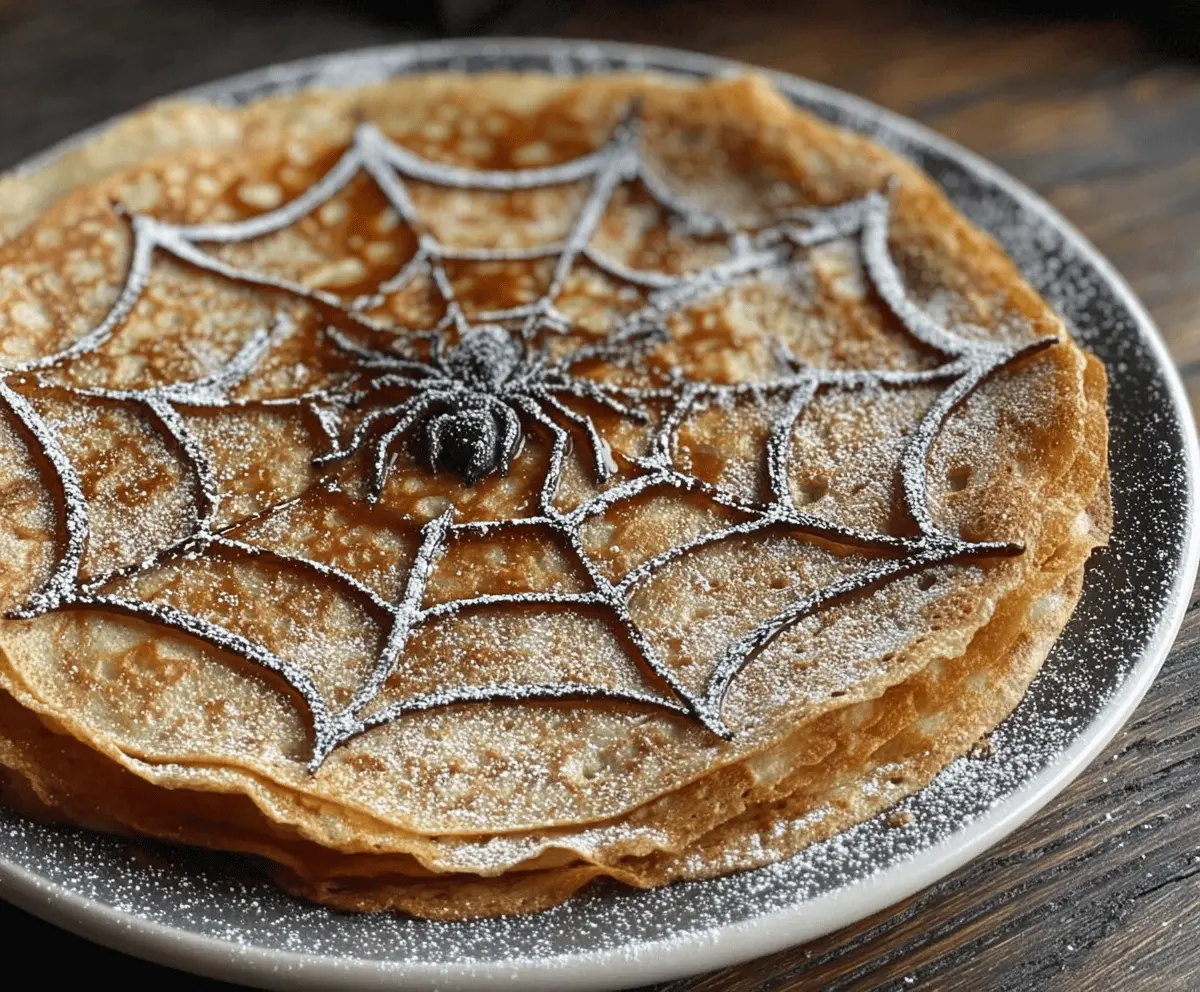
Spiderweb Crepes are a fun and simple twist on the classic thin, golden crepes you know and love. These crepes get their special touch from a delicate spiderweb-like pattern made with chocolate or syrup, which makes breakfast feel a little more playful and special.
I love making these when I want to surprise my family or friends, especially on weekends. It’s amazing how just a little swirl or drizzle added to the crepe batter right in the pan can turn ordinary crepes into something that feels festive and exciting. Plus, kids enjoy helping with the design part—it’s like edible art!
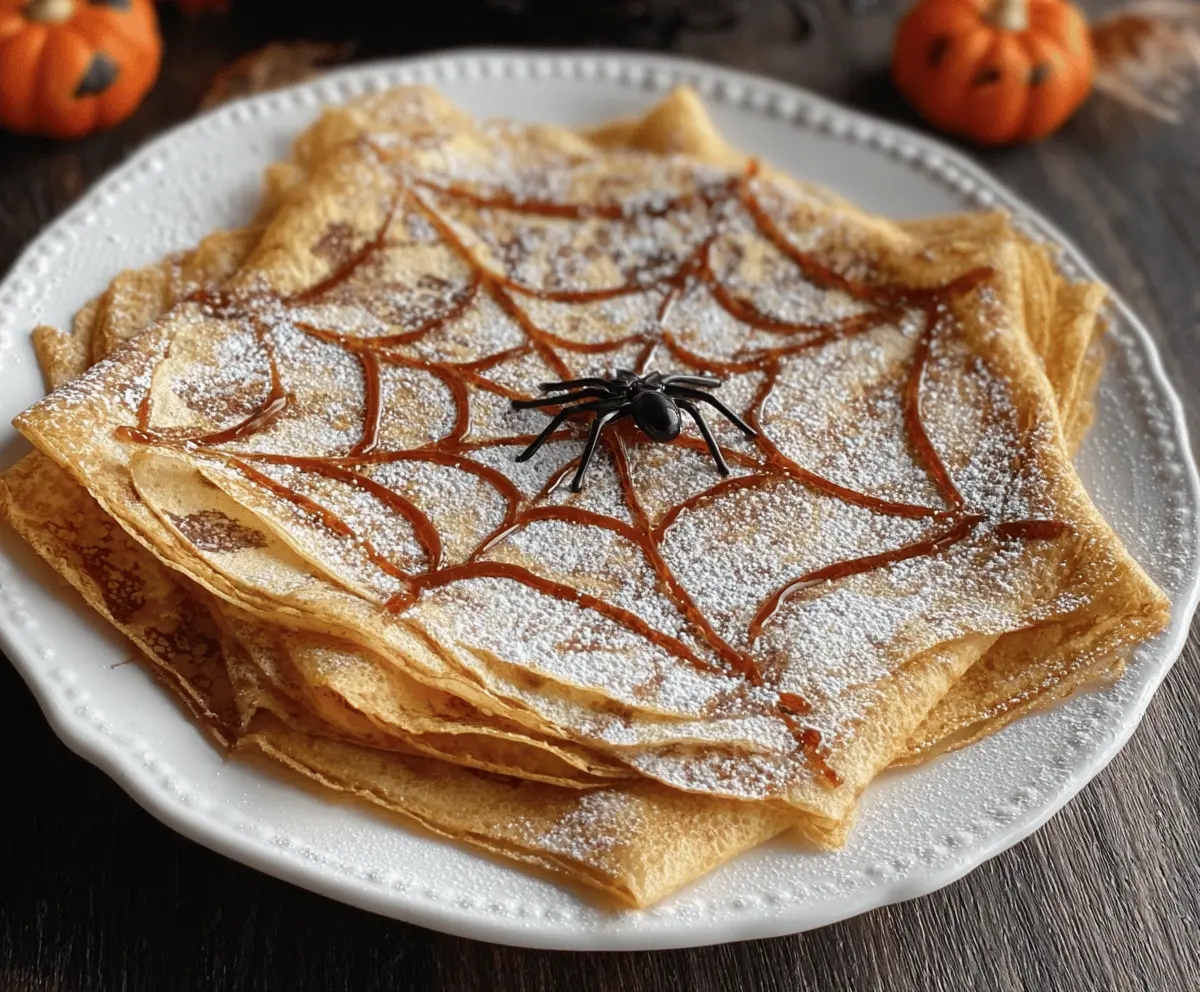
Serving these crepes with fresh fruit, whipped cream, or a drizzle of honey or maple syrup makes for a lovely morning treat. I also like to fold them up and let the spiderweb pattern peek out, adding a fun touch to any breakfast or brunch table. They’re easy to make but look like you spent a lot of time—always a win in my book!
Key Ingredients & Substitutions
Flour: All-purpose flour works best for thin, flexible crepes. If you want gluten-free, try a gluten-free blend but add a little xanthan gum for stretchiness.
Milk: Regular milk gives a nice smooth batter, but you can swap for almond, oat, or soy milk for a dairy-free option.
Butter: Melted butter adds flavor and helps the batter cook smoothly. You can use oil instead, but butter adds a richer taste.
Caramel sauce or chocolate syrup: These create the spiderweb design. Chocolate sauce is my favorite for its taste and easy piping. You can also use colored icing for a more festive look.
How Do You Get Perfect Thin Crepes and a Clear Spiderweb Design?
Start with a smooth batter and let it rest for 15-20 minutes to avoid lumps. Use a non-stick pan and medium heat to cook crepes evenly without burning.
- Pour batter slowly, then swirl pan fast to spread a thin, even layer.
- Cook until edges lift, then flip carefully for a quick second side cook.
- To draw the spiderweb, use a squeeze bottle or piping bag for control.
- Draw lines from the center out, then connect them with curved lines to mimic a web.
- Finish with powdered sugar to highlight the pattern nicely.
Practice and patience are key! Thin batter layers and steady hands for drawing make all the difference. Have fun with the design, and it will look great every time.
Equipment You’ll Need
- Non-stick skillet or crepe pan – it helps cook thin, even crepes without sticking.
- Whisk – perfect for mixing the batter smooth and lump-free.
- Mixing bowls – one for dry ingredients, one for wet, keeps things organized.
- Squeeze bottle or piping bag – great for drawing the spiderweb pattern with syrup or sauce.
- Spatula – needed to flip crepes gently without tearing them.
Flavor Variations & Add-Ins
- Add a teaspoon of vanilla or orange zest to the batter for a sweet, bright flavor twist.
- Swap caramel or chocolate syrup for strawberry or raspberry sauce to add a fruity note and vibrant color.
- Fill crepes with cream cheese and fresh berries for a creamy, fresh surprise inside.
- Try a sprinkle of cinnamon or nutmeg in the batter for a warm and cozy flavor perfect for fall.
How to Make Spiderweb Crepes
Ingredients You’ll Need:
- 1 cup all-purpose flour
- 2 large eggs
- 1 1/4 cups milk
- 2 tablespoons melted unsalted butter, plus extra for cooking
- 1 tablespoon granulated sugar
- 1/4 teaspoon salt
- Powdered sugar, for dusting
- Caramel sauce or chocolate syrup, for spiderweb design
- Optional: plastic spider decoration for garnish (edible or non-edible)
How Much Time Will You Need?
This recipe takes about 10 minutes to prepare the batter, 15-20 minutes for letting it rest, and roughly 20 minutes to cook and decorate the crepes. Altogether, you’ll need about 35-45 minutes from start to finish.
Step-by-Step Instructions:
1. Make the Batter:
In a mixing bowl, whisk together the flour, sugar, and salt. In another bowl, beat the eggs, then add the milk and melted butter, mixing well. Slowly pour the wet ingredients into the dry ingredients, whisking until smooth and lump-free. Let the batter rest for 15-20 minutes to get the best texture.
2. Cook the Crepes:
Heat a non-stick skillet or crepe pan over medium heat and brush it lightly with melted butter. Pour about 1/4 cup of batter into the pan, quickly swirling it around to create a thin, even layer. Cook for 1-2 minutes until the edges start to lift and the bottom is golden brown. Flip the crepe and cook the other side for about 30 seconds. Transfer to a plate and make the rest of the crepes in the same way, stacking them as you go.
3. Decorate with a Spiderweb:
Fold each crepe into quarters or leave flat on a serving plate. Using a squeeze bottle or piping bag filled with caramel sauce or chocolate syrup, draw lines from the center outwards like spokes on a wheel. Then connect those lines with gentle curved arcs to form a spiderweb pattern. Dust lightly with powdered sugar to make the web stand out. Finally, add a plastic spider decoration in the center for a fun, festive touch.
Serve your Spiderweb Crepes right away, with extra syrup, whipped cream, or fresh fruit if you like. Enjoy!
Can I Use Frozen Crepes for This Recipe?
Yes, you can! Just thaw frozen crepes in the refrigerator overnight or gently warm them in a skillet before decorating. This way, they’ll be soft and perfect for adding the spiderweb design.
What Can I Use Instead of Caramel or Chocolate Sauce?
If you don’t have caramel or chocolate sauce, try using honey, maple syrup, or colored icing. Just make sure it’s thick enough to hold the spiderweb shape when piped onto the crepes.
How Should I Store Leftover Crepes?
Store leftover crepes in an airtight container in the fridge for up to 2 days. Place parchment paper between them to prevent sticking. Reheat gently in a warm skillet or microwave before serving.
Can I Make the Batter Ahead of Time?
Absolutely! Make the batter up to 24 hours in advance and keep it covered in the refrigerator. Give it a good whisk before cooking to recombine any settled ingredients.